Mastering Hand-Built Pottery: 12 Essential Clay Techniques
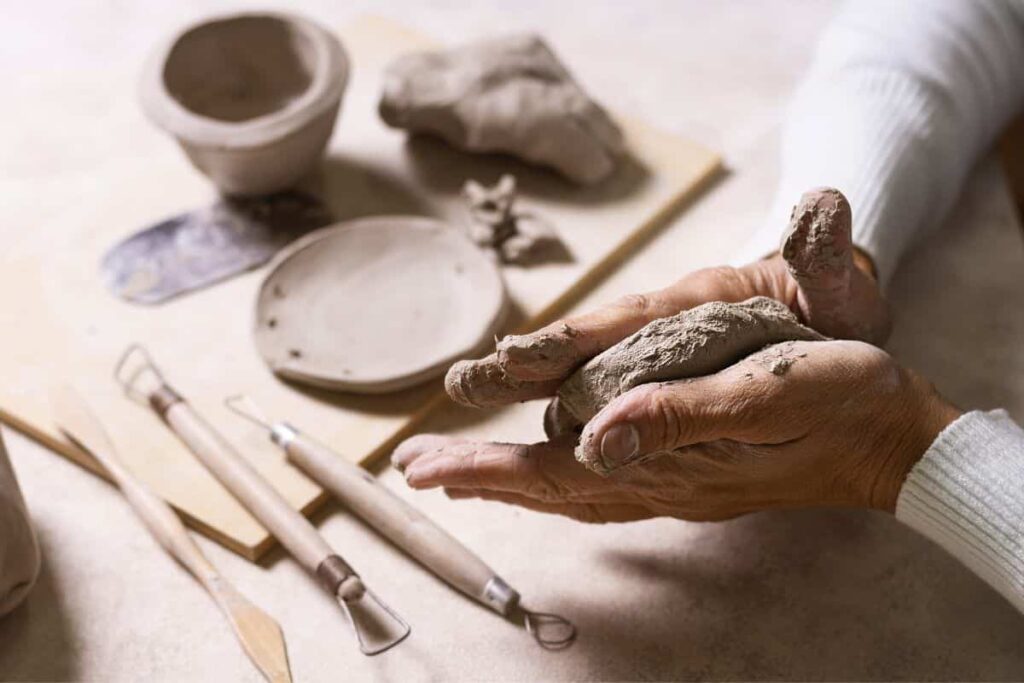
Hand-building pottery is one of the oldest and most rewarding ways to create with clay. Unlike wheel-throwing, hand-building offers a direct, tactile experience—just you, your hands, and the clay. This technique allows for complete artistic freedom, letting you shape and mold each piece in a way that truly feels like an extension of yourself.
For centuries, artisans across cultures have used hand-building to create everything from functional vessels to intricate sculptures. Whether you’re a beginner just starting or an experienced ceramicist looking to refine your craft, mastering key techniques will make a world of difference. Below, we explore twelve fundamental hand-building techniques that will enhance your skills and inspire your creativity.
1. Rolling Coils: The Foundation of Coil Pottery
Rolling coils is one of the most fundamental techniques in hand-built pottery, forming the basis for coil construction. At first glance, it may seem like a simple process, but achieving smooth, even coils requires patience, control, and an understanding of clay’s natural properties. The quality of a coil can determine the strength and stability of a finished piece, making this technique essential for any potter working with hand-building methods.
The process begins with selecting and preparing the right clay. It should be soft enough to roll smoothly but firm enough to hold its shape without collapsing. If the clay is too wet, it will stick to the hands and the work surface, making it difficult to form a consistent coil. If it is too dry, it will crack as it is stretched and rolled. Properly wedging the clay before rolling is crucial, as this removes air bubbles that could weaken the structure of the final piece.
To form a coil, a small portion of clay is first shaped into a compact ball. This initial step helps create an even starting point and prevents weak spots. The ball is then placed on a clean, slightly textured surface to provide gentle resistance. Using both hands, light pressure is applied while rolling the clay back and forth, allowing it to gradually elongate. The key to success lies in maintaining even pressure along the entire length of the coil, avoiding excessive force that could cause flattening. Fingers help guide the rolling motion, ensuring the coil remains rounded rather than irregular or lumpy. If the clay starts to develop uneven thickness, adjustments can be made by focusing pressure on thicker areas while rolling outward.
As the coil reaches its desired length and thickness, it should feel pliable yet strong. Cracks that appear can be smoothed out by gently compressing the clay or adding a small amount of water to restore elasticity. If the coil becomes too soft and sticky, allowing it to firm up slightly before use will prevent it from distorting. The ideal coil should be uniform, without visible weak spots, ensuring a strong foundation for building pottery.
Once the coil is properly shaped, it can be used in a variety of ways. Some potters prefer to leave coils exposed as part of the design, emphasizing texture and movement in their pieces. Others blend and smooth them together, creating seamless surfaces. Coils can also be manipulated into different forms, twisted for decorative effects, or flattened to create layered patterns. Their versatility makes them a crucial element in many traditional and contemporary ceramic styles.
Throughout history, coil building has been an integral part of pottery-making across cultures. Ancient civilizations such as the Jomon culture in Japan and the Pueblo potters of the American Southwest relied on coils to construct durable, intricate vessels. These techniques have been passed down for generations, evolving into both functional and artistic forms. Whether used to create delicate, refined shapes or bold, sculptural works, the ability to roll and control a coil is one of the most valuable skills a potter can develop. With consistent practice, the process becomes intuitive, allowing for more intricate and expressive ceramic creations.
2. Pushing Out the Form: Shaping Clay from Within
The technique of pushing out the form is one of the most transformative aspects of hand-building pottery. Unlike methods that rely solely on adding material or carving away excess, this approach involves working from the inside out, allowing the natural elasticity of clay to expand and shape the piece. By carefully stretching the walls of a vessel, a potter can create smooth curves, full-bodied shapes, and dynamic contours that would be difficult to achieve through other techniques. This method is particularly useful in coil building, where the walls start as a simple cylinder and are gradually coaxed into their final form.
The process begins with a partially constructed vessel, often built using coils or slabs. At this stage, the walls are firm enough to hold their structure but still retain enough moisture to allow movement without cracking. If the clay is too wet, it will collapse under pressure; if too dry, it will resist shaping and may tear. Finding the right balance is crucial. To prepare the piece for expansion, the potter ensures that the walls are evenly thick, as inconsistencies can lead to weak spots during shaping.
With one hand supporting the exterior, the other gently presses outward from inside the form. This can be done using fingers, the palm, or specialized tools such as a wooden rib or a smooth stone. The pressure must be applied gradually, working in small sections to maintain control over the shape. Too much force at once can cause thinning or uneven stretching, leading to structural instability. By methodically pushing outward while rotating the piece, the potter can achieve a symmetrical, organic shape that reflects the natural responsiveness of the clay.
Pushing out the form is often used to create rounded profiles in pottery, such as belly-shaped jars, bulbous vases, or sculptural figures. The technique allows for a level of fluidity and spontaneity, as the clay responds to each adjustment in real time. Some potters prefer to push outward in stages, allowing the clay to rest between adjustments to prevent excessive stress on the material. Others may use a supporting mold or puki—a shallow dish traditionally used by Pueblo potters—to help guide the expansion while preserving the base’s stability.
This approach has deep historical roots in pottery traditions around the world. Indigenous potters in North and South America, Africa, and Asia have long employed this method to create distinctive forms, often finishing their pieces with burnishing or slip decoration to enhance the surface. One of the most famous practitioners of this technique was Maria Martinez, a Pueblo potter known for her elegant blackware vessels. In her work, the process of coiling and pushing out the form was integral to achieving the graceful, rounded silhouettes that defined her style. By carefully expanding the clay and refining the shape with a gourd scraper, she was able to create pieces that embodied both strength and delicacy.
Beyond traditional pottery, pushing out the form remains an essential skill for contemporary ceramic artists. It offers a way to manipulate clay that feels intuitive and organic, allowing the material to dictate its own possibilities. Whether used to create functional ware or expressive sculptures, this method highlights the flexibility and responsiveness of clay, reinforcing the deep connection between the potter’s hands and the evolving form. Through practice, a potter develops a sensitivity to the clay’s limits and potential, mastering the balance between control and spontaneity that defines great hand-built pottery.
3. Patting Slabs: Creating the Foundation of Hand-Built Pottery
The technique of patting slabs is a fundamental and intuitive method in hand-building pottery, used to create flat, even surfaces without the need for rolling tools. This approach is particularly effective for forming the base of a vessel, constructing simple slab-built pieces, or preparing clay for further shaping. Unlike rolling out clay with a slab roller or a rolling pin, patting slabs relies entirely on hand movements, allowing for a direct, tactile connection with the material. The process requires rhythm, control, and an awareness of the clay’s responsiveness to pressure.
To begin, a potter starts with a lump of well-conditioned clay, ensuring it is soft enough to shape but firm enough to hold its structure. The clay is then gently pressed and flattened by repeatedly patting it between the hands or against a stable surface. The motion is similar to shaping dough, with the repeated impact gradually evening out the thickness while preserving the clay’s natural cohesiveness. This technique is often compared to the way traditional tortilla makers pat out masa, working by feel rather than relying on mechanical tools to achieve consistency.
One of the key aspects of patting slabs is maintaining uniform thickness. Uneven areas can lead to weak points in the final piece, making it more susceptible to cracking during drying or firing. To ensure evenness, the potter carefully rotates the slab while patting, feeling for variations in thickness and making small adjustments as needed. The fingertips play a crucial role in this step, detecting any dense spots that require further thinning. If the slab is meant to serve as the base of a vessel, it is often shaped into a rough circle or oval, depending on the intended form.
The method of patting out slabs is especially useful when working with traditional forming tools like a puki, a shallow dish used to shape the bottom of coiled pots. In this case, the flattened slab is placed into the puki and gently pressed to conform to its contours, creating a stable and well-defined foundation. This technique has been used by Indigenous potters for centuries, particularly in North and South America, where coiling and hand-building remain essential practices. By forming the base in this way, the potter ensures that the vessel starts with a solid structure before additional elements are added.
Patting slabs also allows for subtle textural variations, which can enhance the final aesthetic of the piece. The slight irregularities left by hand patting contribute to a more organic, handmade appearance, distinguishing the work from mass-produced ceramics. Some potters choose to refine the surface further by smoothing it with a damp cloth or a wooden rib, while others embrace the natural marks left by the process, incorporating them into the overall design.
Historically, this method has been a crucial part of various ceramic traditions, from ancient earthenware vessels to contemporary hand-built forms. The simplicity and efficiency of patting slabs make it an accessible technique for both beginners and experienced potters, offering a way to engage directly with the clay without relying on additional equipment. The process reinforces the importance of touch in pottery-making, allowing the artist to develop an intuitive understanding of the material’s behavior.
While seemingly straightforward, mastering this technique requires practice and patience. The way the clay responds to repeated patting changes depending on its moisture content, thickness, and even the ambient humidity in the workspace. Through repetition, potters refine their ability to control the thickness and texture of slabs, ensuring consistency in their work. Whether used as a foundational step in vessel-making or as a technique for creating independent slab-built pieces, patting slabs remains one of the most essential and rewarding aspects of hand-building with clay.
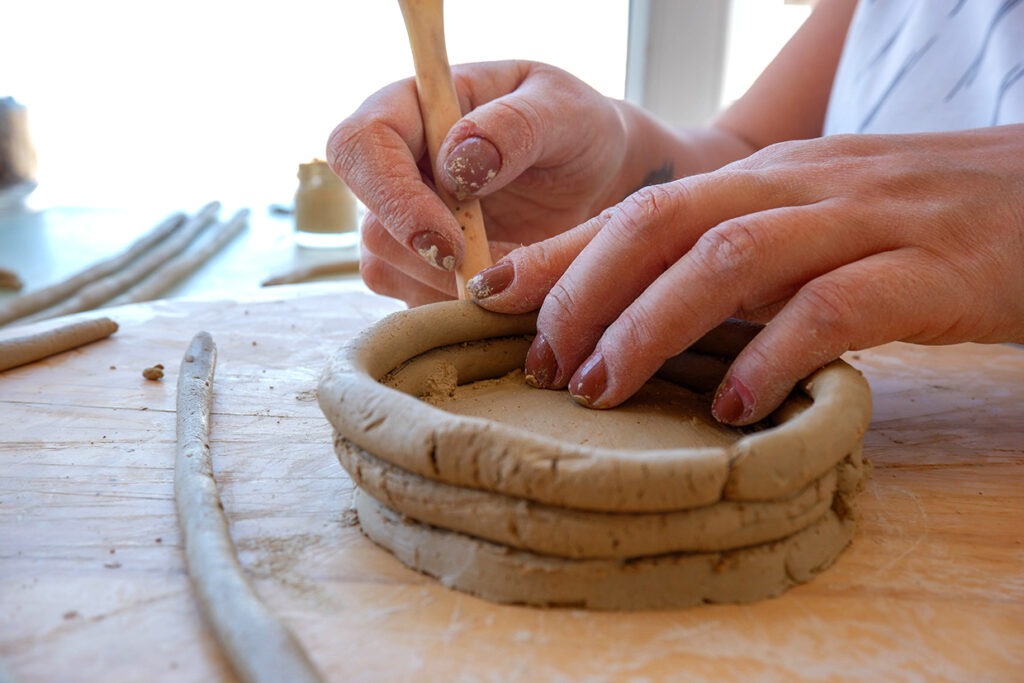
4. Bonding Pinch: The Essential Connection in Coil Pottery
The bonding pinch is one of the most critical techniques in coil pottery, ensuring that each coil seamlessly fuses with the vessel’s body. This step is the foundation of structural integrity, holding the pot together through every stage—drying, firing, and eventual use. Without a proper bonding pinch, a pot may develop cracks, weak points, or even separate completely, making this technique an essential skill for any hand-builder.
At its core, the bonding pinch involves pressing each new coil firmly against the layer below it, creating a unified wall rather than a stack of individual coils. The process begins with placing a fresh coil onto the existing structure, following the vessel’s shape. Instead of merely laying it in place, the potter uses their fingers to press the new coil into the previous one, blending the clay while maintaining an even thickness. This pressure must be firm enough to integrate the layers but not so strong that it distorts the form.
A well-executed bonding pinch requires a balance of control and sensitivity. The fingers should work deliberately, pressing and smoothing the clay in a continuous motion. The index finger often plays a key role, working from the outside of the vessel while the thumb or other fingers reinforce the connection from within. Some potters use a slightly downward and inward motion, ensuring that the new coil compresses against the wall, eliminating any air pockets that could weaken the structure. The angle of the pressure determines the final shape of the vessel—applying more inward pressure can create a narrower form, while a more upright technique allows for vertical growth.
The quality of the bond also depends on the consistency of the clay. If the clay is too dry, it may resist blending, leaving visible separation lines that weaken the pot. If it is too wet, it can become sticky and difficult to control. Maintaining the right level of moisture ensures smooth integration, making the process more efficient. Many potters lightly score the surface where the new coil will be attached or add a thin layer of slip to enhance adhesion, though a well-executed bonding pinch alone is often enough to create a secure join.
Beyond functionality, this technique also affects the aesthetics of the final piece. Some potters choose to leave the coiled texture partially visible, emphasizing the handmade nature of the work. Others smooth the surface completely, blending the clay until no trace of individual coils remains. This choice depends on the desired final appearance and the artistic style of the potter. In both cases, the bonding pinch ensures that the structure is sound, regardless of how the surface is finished.
This method has been used for centuries across cultures, forming the basis of many traditional ceramic styles. Indigenous potters, for example, have long relied on the bonding pinch to create durable, functional vessels that withstand daily use. The technique is as relevant today as it was in ancient times, offering both structural reliability and artistic flexibility.
Mastering the bonding pinch takes practice, as each pot presents different challenges. The clay’s responsiveness, the shape of the vessel, and the desired texture all influence how the technique is applied. Through repeated use, potters develop an intuitive sense of pressure and movement, refining their ability to create strong, beautifully constructed pieces. Whether working on a small, delicate bowl or a large, sculptural form, the bonding pinch remains one of the most fundamental and indispensable techniques in coil pottery.
5. Flat Pinch: Refining the Vessel’s Walls
The flat pinch is a fundamental technique in coil pottery, used to refine the walls of a vessel by thinning and evening out the clay. While the bonding pinch ensures structural integrity, the flat pinch plays a crucial role in achieving the right wall thickness, creating a balance between strength and delicacy. A properly executed flat pinch results in a uniform surface, preventing weak spots and ensuring that the vessel dries and fires evenly.
The process begins once the coils have been bonded securely. Using the thumb and forefinger, the potter gently compresses the clay between their fingers, working systematically around the vessel’s circumference. The goal is to gradually thin the walls to the desired consistency without compromising their stability. The motion is controlled and repetitive, with slight rotations of the pot to ensure even distribution of pressure. Unlike the bonding pinch, which primarily fuses layers together, the flat pinch refines the overall form, smoothing transitions and correcting inconsistencies in thickness.
This technique requires an awareness of the clay’s responsiveness. If the walls become too thin in some areas, adjustments must be made by redistributing pressure elsewhere. The fingers act as both tools and sensors, feeling for uneven sections and making micro-adjustments as needed. The pressure applied is firm yet measured—too much force can collapse the walls, while too little may leave inconsistencies that weaken the structure.
The flat pinch also influences the final shape of the vessel. A light outward pressure can create a more expansive form, while a subtle inward motion can help shape a narrower profile. This shaping is done intuitively, guided by the potter’s vision and the natural tendencies of the clay. Some artists prefer to maintain a slight coil texture for decorative purposes, while others use the flat pinch to create an entirely smooth surface, eliminating any evidence of the building process.
The moisture level of the clay is another factor in the effectiveness of this technique. If the clay is too soft, it may become overly malleable, making it difficult to maintain control. If too dry, it can resist movement, leading to cracks or rough patches. Finding the right balance allows the flat pinch to be both a functional and aesthetic tool, helping to refine the pot’s shape while ensuring durability.
This method is particularly useful in coil-built vessels where an even wall thickness is essential for stability. Many traditional pottery styles incorporate the flat pinch to achieve elegant, well-proportioned forms. Whether used in the early stages of shaping or as a finishing touch before further refinement, this technique remains an essential skill for any hand-builder.
6. Compression Pinch: Shaping the Vessel with Precision
The compression pinch is an essential technique in coil pottery that allows the potter to control the shape of a vessel by subtly drawing the walls inward. While the flat pinch refines thickness and ensures even distribution of clay, the compression pinch defines the vessel’s contour, giving it structure and form. This method is particularly useful for creating narrow-mouthed jars, rounded bodies, or any piece that requires a controlled inward curve.
The process begins once the walls of the vessel have been built up to a certain height. Using both hands, the potter places their fingers on opposite sides of the pot, applying gentle yet firm pressure to slightly compress the clay inward. The movement is gradual, with each press subtly influencing the curvature of the vessel. This controlled inward pressure helps to reinforce the structural integrity of the walls, ensuring that they do not flare outward uncontrollably. Unlike the flat pinch, which focuses primarily on evenness, the compression pinch actively manipulates the form, guiding the pot into its intended shape.
As the potter works around the circumference of the vessel, they must maintain a careful balance between force and finesse. Too much pressure can cause the walls to collapse or buckle, while too little may not achieve the desired contour. The technique is often repeated in small increments, allowing the clay to adjust gradually. As the walls are compressed, they become denser and more stable, reducing the risk of cracks or weak points during drying and firing.
This method also plays a role in refining the pot’s surface. The action of compression smooths out irregularities, helping to merge any remaining coil lines into a unified form. When executed with precision, the compression pinch creates elegant, harmonious curves that enhance both the functionality and aesthetic of the piece. The technique is often used in combination with other methods, such as scraping or stone smoothing, to achieve a polished final result.
The moisture level of the clay is crucial when performing this technique. If the clay is too wet, it may deform unpredictably, making it difficult to maintain control over the shape. If too dry, it will resist movement and may crack under pressure. A perfectly conditioned clay body responds smoothly, allowing the potter to shape it with confidence.
Historically, this technique has been a vital part of many traditional pottery styles, from ancient hand-built storage jars to contemporary sculptural ceramics. Whether used to create subtle curves or dramatic contours, the compression pinch remains an indispensable tool for shaping hand-built pottery with precision and artistry.
7. Scraping: Refining the Surface and Perfecting the Form
Scraping is a crucial step in hand-building pottery that enhances both the structure and aesthetic of a piece. While techniques like pinching and coiling define the form, scraping refines it, ensuring the vessel’s surface is smooth, even, and free of imperfections. This method helps to correct inconsistencies in wall thickness, remove excess clay, and create a more polished appearance before the final drying and firing stages.
The process typically begins once the clay has reached a semi-firm state, often referred to as leather-hard. At this stage, the pot retains some flexibility but is stable enough to withstand light pressure without warping. A scraper, which can be made of metal, wood, or a smooth shard of pottery, is drawn gently across the surface of the vessel. The goal is to refine the shape by eliminating bumps, rough textures, or uneven areas that may have resulted from the earlier stages of hand-building.
Scraping requires a delicate balance of control and sensitivity to the clay’s condition. Too much pressure can remove more material than intended or weaken the walls, while too little may not achieve the desired level of smoothness. The potter moves systematically around the vessel, following its natural curves and contours, ensuring that each section is carefully refined. Some artisans prefer to use a combination of scraping motions—broad, sweeping strokes for general shaping and smaller, precise movements for fine adjustments.
This technique not only improves the vessel’s visual appeal but also strengthens its structural integrity. By evening out the walls, scraping helps prevent weak spots that could lead to cracking or breakage during drying and firing. It also prepares the surface for additional decorative techniques, such as slip application, burnishing, or carving. A well-scraped pot provides a clean, even canvas that enhances any subsequent embellishments.
The timing of scraping is critical. If done too early while the clay is too soft, the surface may become distorted, making it difficult to achieve a smooth finish. If left too late when the clay is too dry, the process can become more labor-intensive and may result in unwanted scratches or chipping. A skilled potter learns to recognize the perfect moment when the clay is firm yet still responsive to refinement.
Many traditional pottery styles incorporate scraping as an essential part of the hand-building process. Whether working on a functional vessel or a sculptural piece, this technique remains one of the most effective ways to achieve precision and elegance in handmade ceramics.
8. Sanding: Achieving a Silky Smooth Finish
Sanding is a final refining step in hand-built pottery, used to perfect the surface texture and eliminate any remaining imperfections before firing. While earlier techniques like scraping and smoothing shape the form, sanding takes refinement to the next level, ensuring a flawlessly polished finish. This method is particularly useful for burnished pottery or pieces that require a smooth surface for glazing or decoration.
The process is typically performed when the clay has reached a fully dry, bone-hard state. At this stage, the vessel is extremely fragile, requiring careful handling to avoid accidental breakage. Using fine sandpaper, a potter gently rubs the surface to remove small bumps, tool marks, or inconsistencies left from the hand-building process. The motion should be light and controlled, gradually working over the entire piece to achieve an even texture. Some potters prefer to use natural abrasives like smooth stones or fine-grit sanding pads, depending on the desired finish.
One of the biggest challenges of sanding is managing the dust it creates. Since bone-dry clay particles are lightweight and easily airborne, it’s important to work in a well-ventilated area or use a damp cloth to minimize dust spread. Wearing a mask can also help protect against inhaling fine clay particles. Some potters opt for wet sanding, lightly dampening the surface to reduce dust while still achieving a smooth result.
Sanding is particularly valuable for pottery that will undergo burnishing or high-gloss finishing techniques. A well-sanded surface allows for a more uniform sheen when polished with a stone or when a slip or glaze is applied. Even if the final piece is left unglazed, the subtle refinement achieved through sanding can enhance its tactile quality, making the vessel feel soft and pleasing to the touch.
Timing is crucial—attempting to sand before the clay is fully dry can lead to unwanted deformations, while waiting too long might make the process unnecessarily difficult. By carefully managing pressure and technique, a potter can turn a roughly finished piece into a beautifully smooth work of art, ready for the kiln.
9. Stone Smoothing: Refining the Surface with Tradition
Stone smoothing is a time-honored technique used to create an even, refined surface on hand-built pottery. Unlike sanding, which is performed on bone-dry clay, stone smoothing is done while the piece is still at a leather-hard stage, allowing the potter to gently compress and unify the surface before the clay fully sets. This technique not only enhances the vessel’s appearance but also strengthens its structure by compacting the clay particles, reducing the risk of cracking during drying and firing.
The process involves using a smooth, hard stone—often a polished river rock, a piece of agate, or even an old ceramic shard—gliding it carefully over the surface of the clay. The potter applies gentle but firm pressure, moving the stone in circular or sweeping motions to even out textures, erase tool marks, and refine the shape. The friction created by this motion slightly compresses the clay, making it denser and more resistant to moisture absorption.
Stone smoothing is particularly valuable when working with coiled or slab-built forms, where seams and joints can create slight irregularities. By carefully working over these areas, the potter ensures a seamless transition between different sections of the vessel. If done skillfully, the process can produce a surface that appears almost polished before firing, creating a natural foundation for additional finishing techniques like burnishing or slip decoration.
The effectiveness of stone smoothing depends on the moisture content of the clay. If the piece is too soft, it may warp or develop unwanted indentations. If too dry, the stone may leave streaks or fail to make a noticeable difference. Experienced potters learn to recognize the ideal moment—when the clay is firm yet still pliable enough to respond to pressure without damage.
This technique has deep roots in ancient pottery traditions, from Native American ceramics to African and Asian hand-building practices. Many historical pottery styles rely on stone smoothing as a crucial step in achieving their characteristic sleek, elegant surfaces. Even in modern pottery, this method remains a simple yet effective way to enhance the quality of hand-built forms, preserving both their beauty and durability.
10. Stone Polishing: Creating a Lustrous, Glossy Finish
Stone polishing is a finishing technique that brings out a natural sheen on a pottery surface without the use of glaze. Unlike stone smoothing, which refines the surface at the leather-hard stage, polishing is performed when the clay is nearly dry, just before it reaches full bone-dry hardness. This method compresses the clay particles even further, creating a smooth, reflective surface that enhances both the visual and tactile qualities of the piece.
The process begins with selecting a highly polished stone—such as agate, quartz, or a smooth river pebble—that glides effortlessly over the clay without dragging or scratching. The potter gently rubs the stone against the surface in repetitive, overlapping motions, gradually working over the entire form. The pressure must be firm yet controlled, ensuring that the clay is compacted without damaging the delicate structure of the drying piece.
Moisture control is crucial in stone polishing. If the clay is too dry, the stone may create fine scratches rather than a polished finish. To counteract this, some potters lightly dampen the surface with a soft cloth or their fingertips, reviving just enough moisture to allow the clay to respond to the burnishing action. The key is to maintain an even level of dampness throughout the process, working methodically to prevent streaks or uneven patches.
Polishing enhances the natural beauty of the clay body, making the colors appear richer and more saturated after firing. This technique has been used for centuries in traditional pottery, from the highly burnished blackware of the Pueblo potters of the American Southwest to the refined ceramics of ancient Greece and China. Many potters use stone polishing as a preparatory step before applying terra sigillata—a fine slip that intensifies the glossy effect—or as a final surface treatment for unglazed pottery.
Beyond aesthetics, stone polishing also serves a functional purpose. The compressed clay surface becomes more resistant to water absorption, making the vessel slightly more durable. The final result is a pot with a soft, silky feel and a natural luster that captures and reflects light beautifully, showcasing the craftsmanship behind every movement of the stone.
11. Slipping: Enhancing the Surface with Liquid Clay
Slipping is the process of applying a thin layer of liquid clay, known as slip, to the surface of a pottery piece. This technique is used for both aesthetic and functional purposes, allowing potters to modify the color and texture of their work while also improving the durability of the surface. Unlike glazing, which creates a glassy coating, slip remains an integral part of the clay body, bonding with it as the piece dries and fires.
The process begins with selecting or preparing a slip that complements the clay body. Some potters create their own slip by mixing finely sieved clay with water until it reaches a creamy, paint-like consistency. Others use specially formulated slips with added minerals to achieve different colors or surface effects. The consistency of the slip is critical—it must be fluid enough to spread evenly but not so thin that it runs uncontrollably.
Application methods vary depending on the desired effect. Some potters use soft brushes to paint slip onto the surface in even layers, while others dip the entire piece into a slip-filled container for complete coverage. Another approach involves pouring or drizzling slip over the clay to create organic, free-flowing patterns. The timing of application also plays a crucial role; slip adheres best when applied to leather-hard clay, allowing it to integrate smoothly without cracking or peeling.
One of the artistic advantages of slipping is the ability to carve or scrape away sections of the dried slip to reveal the clay beneath—a technique known as sgraffito. This method creates striking contrasts and intricate designs, adding depth and texture to the finished piece. Additionally, some potters layer different colored slips to produce multi-tonal effects, enhancing the visual complexity of their work.
Historically, slipping has been a fundamental part of pottery traditions around the world. Ancient Greek red- and black-figure pottery relied on fine slips for their distinctive decorations, while many Indigenous American and Asian ceramics feature slip-painted patterns that highlight cultural motifs. Even in contemporary pottery, slip remains an essential tool for surface decoration, offering a versatile way to personalize and refine hand-built forms.
Beyond aesthetics, slip also plays a structural role. When applied correctly, it helps to strengthen the surface by filling in small pores and imperfections. This added layer of clay can make certain pottery forms more resistant to wear, ensuring that the final piece is both visually appealing and functionally robust.
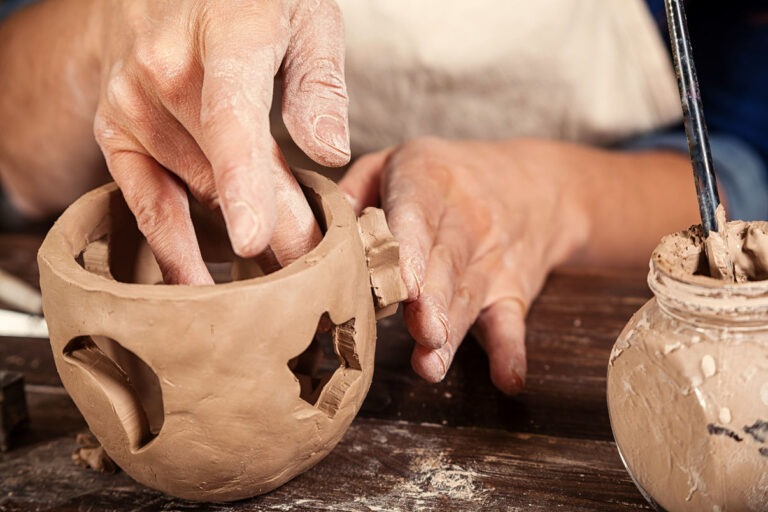
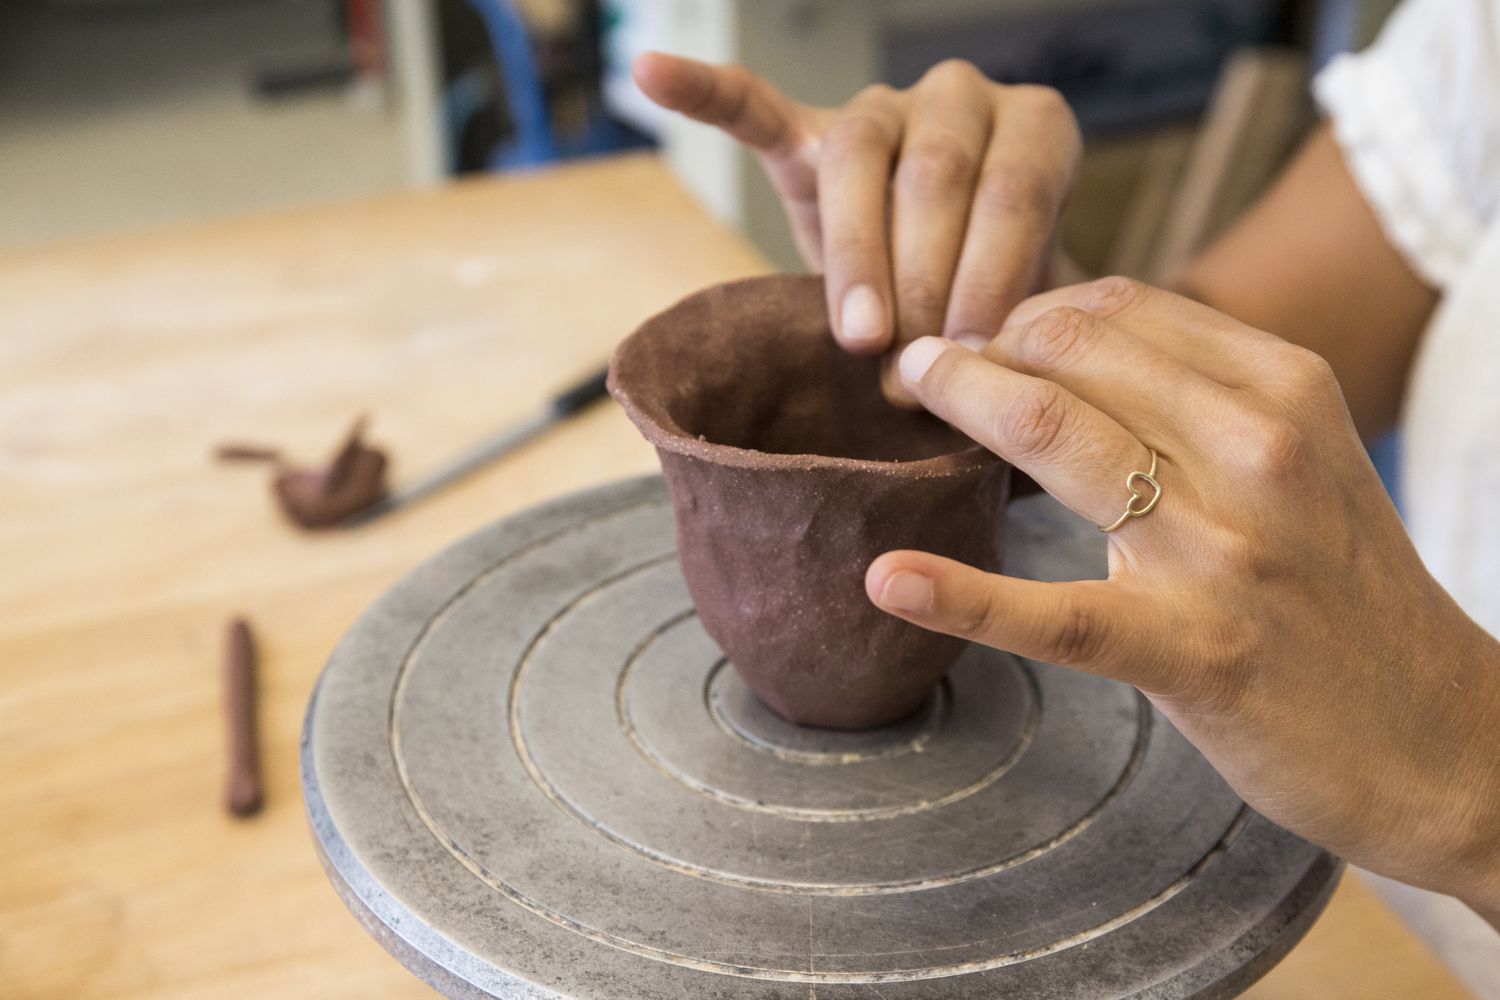
12. Pinch Pots: The Foundation of Hand-Built Pottery
Pinch pots represent one of the oldest and most fundamental pottery techniques, offering a direct and intuitive way to shape clay with just the hands. This method involves forming a vessel by pressing, stretching, and thinning the clay using only the fingers, allowing for an organic and deeply personal connection between the potter and the material. Despite its simplicity, the pinch pot technique can be used to create a wide variety of forms, from small cups and bowls to more intricate sculptural pieces.
The process begins with a lump of clay, roughly the size of a fist. The potter gently presses a thumb into the center of the clay ball to create an initial cavity. From this starting point, the walls of the vessel are gradually shaped by pinching the clay between the thumb and fingers. This repetitive motion allows for precise control over the thickness of the walls, ensuring that the pot remains balanced and uniform. Careful attention is required to maintain even pressure, as inconsistencies can lead to weak spots or cracks during drying and firing.
As the form takes shape, the potter refines the surface by smoothing out any uneven areas with damp fingers or a small tool. Adjustments can be made to enhance symmetry or create intentional variations, adding a unique character to each piece. The simplicity of this technique makes it an excellent starting point for beginners, yet experienced potters often return to pinch pots as a way to explore new shapes and ideas without the constraints of more rigid construction methods.
Pinch pots hold a significant place in the history of ceramics, with ancient cultures across the world relying on this technique long before the invention of the wheel. Some of the earliest known pottery artifacts, dating back thousands of years, were formed using this method, demonstrating its enduring practicality and artistic potential. Even today, contemporary ceramicists incorporate pinch pots into their work, combining this ancient technique with modern design sensibilities.
Beyond their historical and artistic value, pinch pots also serve as an important exercise in understanding clay’s behavior. The direct contact with the material helps potters develop a feel for its plasticity, responsiveness, and structural limitations. This foundational knowledge translates into other hand-building techniques, making pinch pots an essential skill in any ceramic artist’s repertoire.
Hand-building is a deeply personal and expressive way to work with clay. Mastering these techniques will not only improve your craftsmanship but also deepen your connection to the material. Whether you’re making functional pottery or sculptural art, these skills provide a solid foundation for endless creative possibilities. Keep practicing, experiment with different methods, and most importantly—enjoy the process!